|
|
 |
Knowledge Is Key
For Intelligent Decisions
Satellite Logic is a leading,
authoritative source of information in
the Satellite Industry. Located in the
heart of the Silicon Valley, Satellite
Logic provides one of the most
valuable and comprehensive
knowledge bases on the Satellite
market! This is a primary Worldwide
information center which enables our
clients to analyze, evaluate, inquire
and select their best tailored
solutions. Our company sets the
industry standards for targeted
buying leads, reflecting a dramatic
advance over traditional marketing
solutions.
|
|
|
 |

Unless you bought your car with a built in satellite radio, or just using
a portable device, you'll have to install one. But not only in your car.
You may want to install it at home, on your boat, in your truck and
so on.
Installing your satellite radio is not an impossible mission, though
let's face it - for some of us it might be a nightmare. There are many
different types of satellite radio receivers, wether plug and play
tuners or hardwired in-car tuners. Plug and play tuners are units
that mount on the dashboard of the vehicle. They typically come with
one or more devices to connect the tuner to the stereo, as well as a
cigarette lighter adapter and a mounting bracket. In-car tuners are
usually rectangular boxes that will be controlled by the head unit
and powered by the car power supply.
Here are the main steps for installing your plug and play tuner.
Step 1- Install the mounting bracket. Select a location that does not
obstruct the drivers view of the console or the road. The bracket
should also be placed within arms length of the drivers seat. To
mount the bracket to the dash, first clean off the spot with alcohol
wipes. Wait for this to dry, then remove the adhesive backing from
the bracket and press firmly onto the dash for at least 30 seconds.
Wait at least an hour before applying any weight to the bracket. The
bracket can then be reinforced with screws or bolts if needed. Once
the bracket is in place, slide the radio unit in place.
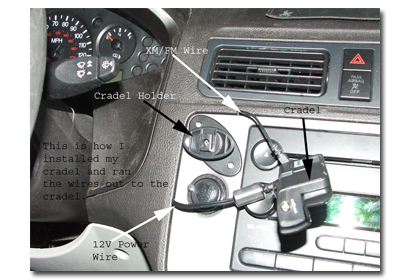
Step 2- Connect the unit to the stereo. If your stereo has an
auxiliary in port, use the supplied adaptor to connect the unit directly
to this port. If you plan on using a cassette adapter, connection is as
simple as putting the cassette into the stereo. If you choose to use
an FM modulator, set both the modulator and the head unit to the
same frequency.
Step 3- Connect the antenna. If the antenna has an adhesive
backing, use the same process as mounting the bracket. If the
antenna is magnetic, simply place it on the roof of the car. The
optimal placement for the antenna is the highest point on the car.
Run the antenna wires through one of the door seals, but make sure
the cord will not be damaged by the normal operation of the door.
Once the cord is inside the car, run it beneath the carpet all the
way up to the satellite tuner and plug it in.
Step 4- Connect the unit to a power source. This is usually done by
way of a cigarette lighter adapter. If you plan on hardwiring the
power line, use crimps and appropriate fuses to make a good
connection to a 12v switched power line.
Step 5- Activate the satellite radio. This can usually be done online or
over the phone. You will need the activation code for the radio. Once
the radio is activated, it will function normally.
Here are the main steps for installing your head unit controlled
satellite radio.
Step 1- Mount the tuner box. Select a location that will be out-of the
way, and easy accessible for wiring purposes. This is usually either in
the trunk or under one of the rear seats. Use the included hardware
to bolt the box into something solid. Be wary of puncturing floor
panels, and be aware of what you are drilling into. Do not place the
unit beneath any carpeting.
Step 2- Wire the power lines for the box. Before you do this,
disconnect the negative terminal from the car battery. Find a 12v line,
either switched or non-switched, that you are able to tap into. It is
best to use either the head unit power source or the cigarette lighter
power source. To split the line, clip the existing cable at the desired
location and crimp the three lines back together. Fuse the line before
and after the split. Run the power cable beneath the carpet back to
the tuner box and plug it in.
Step 3- Hook the tuner box to the stereo. The unit should come with
two cables: an RCA patch cable and a bus controller cable. Plug both
of these cables into their respective ports in the tuner box and run
them up to the head unit. Plug them into the ports in the back of the
head unit.
Step 4- Mount the antenna. If the antenna has an adhesive mount,
first clean the area you intend to mount it on, then remove the
adhesive backing and press firmly for at least 30 seconds. In the case
of a magnetic mount antenna simply place it where you want it. The
best mounting location is the highest point on the car. Be sure the
antenna is not obstructed by any part of the car. Run the wires into
the car through a door seal, then underneath the carpet until you
reach the tuner box. Plug both the ground (terra) and satellite
antenna cables into the unit.
Step 5- Activate the unit by following the instructions provided. You
will need the activation or identification numbers for the unit, so write
these down before you call.
The cost of an average satellite radio installation include the
receivers, mounting hardware and activation. Activation costs are
costs Sirius and XM charge to start service. With a little bit of time
spent researching you can find many promotions that will allow you
to save up money. Activation costs vary, where $5.00 with Sirius and
$9.99 with XM will get you ready to go. Telephone activation is
$15.00 with Sirius and $14.99 with XM. Then you have the monthly
subscription costs which depend on several factors.
The typical cost of a car satellite radio installation:
* Receiver $75 - $125
* Radio $125-250
* Antenna $60.00
* Labor $80.00
* Activation $10
The typical costs for a home satellite radio installation:
* Receiver $150-$300
* Antenna $60.00
* Activation $10
Portable units are now being offered and can give you the ease of
using your satellite radio anywhere you want! Each room in your
house would require a home kit, which includes antennas, output
cables, and power supplies. Home kits offer flexibility and ease of
use as they can be plugged into your home stereo, computer, and
boom boxes.
The typical costs for a portable satellite radio installation:
* Receiver $120
* Home Kit $140
* Boombox X 2 $100
* Activation $10
If you intend to install a satellite radio in your car, you might want to
consider buying a new satellite-read car stereo. Many local dealers
will offer built in car satellite radio but there is still the problem of
getting a necessary satellite radio receiver. And they may be costly.
It is possible in some cases to use the existing car stereo that
doesnt support satellite radio. There are two common ways of
connecting the receiver to the available non-satellite radio. Option
one: use the radio inputs (in most cases the CD) and install a control
unit for tuning up the satellite radio streams. Option two: install a
satellite radio receiver that broadcasts the satellite radio signal in FM
frequency. The place to install the receiver will depend: under the
seat, in the trunk and so on. Connect the receiver to a satellite radio
antenna mounted on the cars exterior.
Armed with this information, you can figure out your satellite radio
costs and make an informed choice.
|
|
|
|