|
|
 |
Knowledge Is Key
For Intelligent Decisions
Satellite Logic is a leading,
authoritative source of information in
the Satellite Industry. Located in the
heart of the Silicon Valley, Satellite
Logic provides one of the most
valuable and comprehensive
knowledge bases on the Satellite
market! This is a primary Worldwide
information center which enables our
clients to analyze, evaluate, inquire
and select their best tailored
solutions. Our company sets the
industry standards for targeted
buying leads, reflecting a dramatic
advance over traditional marketing
solutions.
|
|
|
 |

Once you have picked a Sirius satellite radio and you know how you
are going to connect to your existing car stereo, pay attention to the
features, number of pre-selects, configuration of the remote control,
and the quality of the display. Some displays are hard to read in any
light conditions, other are so bright that they might distract you at
night. Finally, some units have fans or power supplies that whistle,
which might annoy you when you play your system at low sound
levels.
The optional installation kit of a Sirius satellite radio should include a
large home antenna, a power adapter, and a fixed metal mounting
bracket. The first step of the installation process is to activate the
unit. You can do that at home, in your car, or in your office. Never
throw away the box you receive because there is some code on it
and you will need it. There is also a letter with an ID and password.
To activate the unit, mount the suction base from your car kit on the
desk and then plugg the radio into a wall socket using the home
power adapter. If you only get the car kit, then you will have to drive
your car outside and use the cigarette lighter to get started.
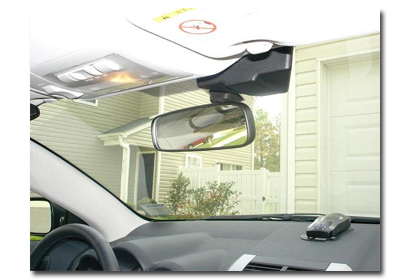
Picking an installation spot is probably the hardest part of the whole
installation. Most cars have little room on the dash to put the radio
module, and few people like wires running out in the open. At the
same time, one doesnt want to drill holes in the dash of a nice car, it
really hurts the resale value. Then again, you want the radio in a
place where you can read the display and easily get at the controls
while driving. The big question is how much work do you want to do.
For example, satellite radio works great when mounted on top of the
dash. However, to make it look good, you will have to take the dash
apart to fish in the wiring. This is a lot of effort. In contrast, you can
mount the radio on the console, and the wiring is easy to conceal
behind the console and under the dash. Keep in mind that most of
the satellite radios have displays that emit a lot of light. As a result,
you should keep the radio mounted low and out of your line of sight,
especially if you do a lot of night driving. Mount the radio on the
console, on the driveshaft hump, or on a customized bracket mounted
to the console or under the dash.
Connect the ground. The ground wire is the black wire that comes
from either your satellite radio, or your FM modulator unit, or both.
Find a good solid metal brace under your dash, and attach these
black wires to that brace. You can often use an existing screw under
your dash to use as a ground. Loosen the screw, slide the spade
lugs from the wires under the screws, and tighten it back up. Screws
under the glove box door are good ground connection points.
Connect the power. The red wire that comes from either your satellite
radio, or your FM modulator, or both, need to connected to switched
12 volt power. You will likely need a volt meter, or at least a test light
to find a good connection point. There are often lugs available in your
fuse box for connection of switched 12 volt power. If not, then one of
the wires going to the radio will be switched 12 volts. Make sure that
the wire you pick really is switched 12 volt, and that it is not
connected to the light dimmer. Cigarette lighters look like good power
sources, but they are normally live all the time, not switched. Once
you find a power location, ensure that you make a secure connection.
Insulate it with black tape to ensure you do not get any accidental
connections to ground or other wires. Make sure that the fuse for the
satellite radio is as close to the power source as possible, you want
the fuse to protect the wiring as well as the radio.
Run the antenna line. Find a good location for the satellite antenna.
It needs to go on the highest point of the car. It will work near the
edge of the roof, but may work better in the middle. You can run the
antenna wire through a door opening or through the trunk lid
opening. Opening and closing a door on the antenna wire should not
hurt the wire. If the wire looks pinched, then you may want to try
something else. If there is more than a few inches of antenna wiring
on the outside of the car, use some type of sticky tie down clamps to
make sure that the wire is secure and will not flap in the wind. If it
does flap or vibrate, it will quickly fail.
Once you have the antenna wire inside the car, you have two choices.
You can do a high quality permanent install, or you can do a more
temporary install. The permanent install would be to remove the back
seat and rocker panel covers, and route the antenna cable under the
carpeting. This will ensure that the wire is not damaged by feet or
other items in the car. The more temporary method is to run the wire
through the gap at the edge of the seats, or between the seats, and
under the floor mats. This works best of a vehicle that has a single
user. If you have kids in the car, especially the back seat, then spend
the time to do the better install.
Some users, especially those in the northern latitudes, and semi-truck
drivers, may want to use a more powerful external antenna, such as
those available from Terk. In doing so, you may find a mismatch in the
antenna connectors. Older radios and antennas used two connectors,
one for the satellite, the other for ground stations. Newer units carry
both signals on a single connector. Adapters are available to convert
between the two connector types. If you have a two connector
antenna, make sure you connect both connectors.
Connect the modulator. The FM modulator converts the audio coming
out of your satellite radio up to an FM station frequency. To make this
work, the modulator has a connection for your car radio antenna, and
a cable the plugs into your in-dash stereo in place of the car radio
antenna. If you are lucky, your car will have a splice or junction in the
car radio antenna wire behind your glove box door, or under the
dash. If you are not as lucky, you may have to reach behind your in-
dash radio, or even pull your in-dash radio out to get at the antenna
wire. Pull the antenna wire out of your in-dash radio, and plug it into
the modulator. Then plug the antenna feed from the modulator back
into your in-dash stereo where the antenna wire was just removed.
Once your modulator is connected up, you need to mount it under
your dash. These boxes are light, so you can often tie it up with cable
ties, or use black electrical tape to mount the modulator. Make sure
that it doesnt rub on anything, and that it doesnt interfere with your
heater controls. Make sure it is snugly mounted so it doesnt fall out
or rattle.
Install the radio. Now that you have all the wiring connected, it is
time to mount the radio. It is possible to use double-side sticky tape
to mount the radio unit to your dash, either on the front of the dash,
or on top of the dash. Your install kit may also come with an industrial
style sticky tape to mount a bracket to your dash for the radio to fit
into. If neither of these work, you may have to drill holes to mount
the mounting bracket. Make sure that you can swivel the radio and
position it as you want prior to doing any drilling. Drilling into the
console or floor is also an option. Be careful if you drill into the floor
that you do not drill into anything under your car, such as a gas line,
brake line, or your transmission. If you still cannot mount the satellite
radio the way you want, consider checking into custom mounting
brackets and posts at electronics stores and car parts stores. Finally,
you may find that you need to make a custom bracket. Home Depot
sells aluminum bars that are 1/4 or 3/8 inches thick by 1-1/2 inches
wide. These can be cut, bent, and drilled as needed to make any
kind of bracket for your satellite radio.
Once the radio unit is mounted, dress out the excess wiring. This
includes routing the wires neatly between components, securing the
wiring with wire ties, and wrapping up the excess wire lengths and
stuffing it under the dash. Make sure that there is just a little slack in
all of the wiring to accommodate vibration of the various parts. Also
make sure that no wires run across sharp edges or the pointed tips
of screws. Finally, make sure that the wiring is clear of both the driver
and passenger feet to avoid accidental damage.
|
|
|
|